I decided I wanted a "tailstock"
winder because of the ability to easily use top plates, and
to get away from the double stick tape. The tailstock type
is quicker and easier to setup and change bobbins.
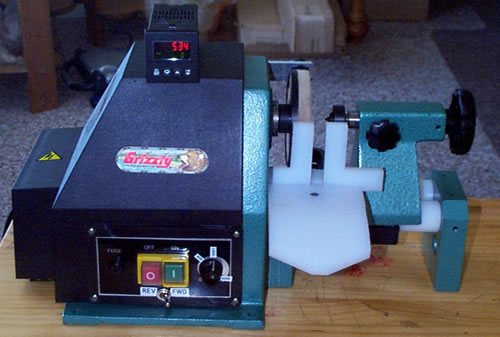
For this winder I purchased a new variable
speed wood lathe from Grizzly Industrial supply. Cost was
$139.00. I purchased a Red Lion dual counter (programmable
w/ switching output) and a hall effect sensor which triggers
the counter.
The Counter will count in excess of 3000
counts per minute, and the sensor is triggered by an alnico
rod magnet set into the edge of the faceplate. The sensor
bracket and mounting allows for 2 axis adjustment of the sensor.
Instead of having the lathe it's full original
length, and instead of cutting down the rails, I replaced
them w/ cast UHMW Polyethylene (Ultra High Molecular Weight)
rails 8 inches long. I used the toolrest bracket to mount
a hand rest and integral winding guides made from more of
the UHMW Polyethylene in sheet form, the guides are fully
adjustable, and the hand rest slopes downward for comfort.
I bent the UHMW Polyethylene sheet with a heat gun and clamping.
I also installed a tensioning device at the front edge of
the handrest as was used on the previous winder. It is not
shown in these photos.
I added a reverse switch to the lathes
wiring to allow reverse winding, and wired the counter into
the same harness as well.
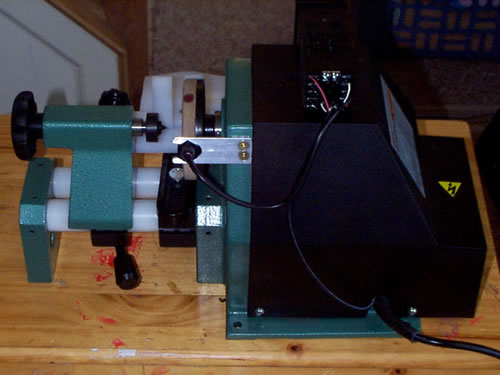
This winder is very sturdy, very accurate,
runs very true, and will wind much more quickly than I need.
To aid in centering the bobbins and provide
a secure hold so they do not spin on the faceplate I recessed
the faceplate in the shape of the bobbins to the thickness
of the forbon. The recess shape is a compilation of all the
baseplate shapes, and holds them all securely. The deeper
relief at the bottom of the recess if for the electrical eyelets.
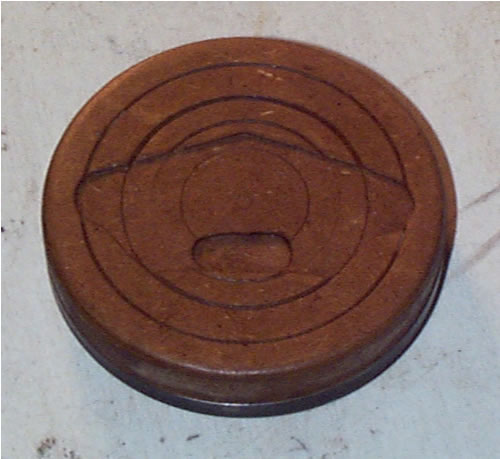
To increase the durability of the faceplate
I coated it with several layers of thin superglue.
One significant difference from the modified
drill press winder is that with the tailstock winder design
the wire must be moved side to side since the bobbin is stationary.
I do this by pinching the wire between felt. This also allows
me to add more winding tension as desired. If I have one complaint
it is in the tailstock of this lathe. The bottom bracket is
plastic and tends to flex if put under to much pressure. When
it flexes the bearings are out of line and make noises. It's
not a big issue since the pressure at which it flexes is more
than what is required for winding pickups, but I'll be replacing
the bottom plastic piece with a billet aluminum one shortly.
I may replace the rails with billet aluminum as well eventually.
Total cost for this winder was just under
200 USD.
OK, I've had some interest and inquiries
into the current setup so here's a current pic and details.
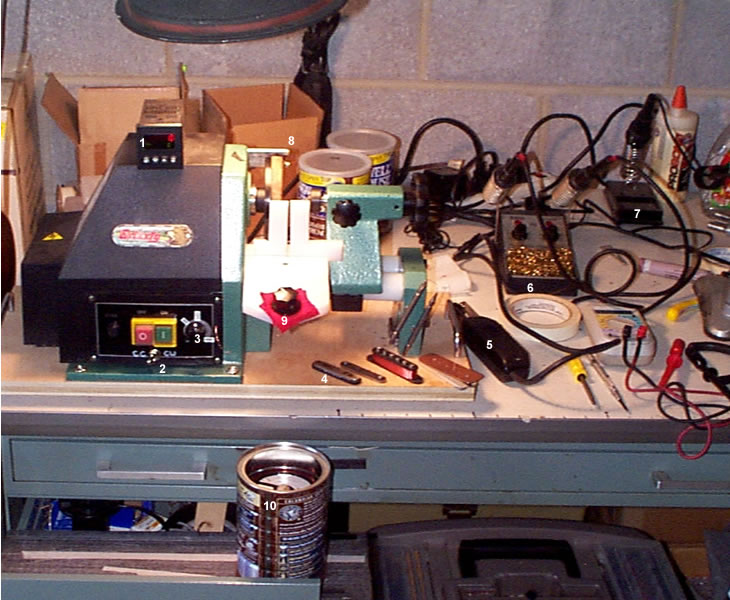
1. The winder itself, mounted to a 3/4"
thick baltic birch plywood board 22"x12", carry
handles at each end and the whole thing rests on 8, 1"
dia rubber feet.
2. Fwd/Rev switch, now labeled CC and CW
based upon the direction of wind.
3. Speed control which was original
4. Plates for the top of different bobbins;
the live center pushes against these to help prevent warping.
5. Hot wire stripper
6. Dual temperature control soldering station,
both 500-850*, one with fine point one with 3/16" chisel
tip.
7. 100watt soldering iron.
8. Boxes full of different magnets in A2,
A5, ceramic8.
9. Tensioning device
10. Magnet wire in a coffee can. I found
that the 2# spools of wire fit perfectly inside the small
cofee cans. The cans are the ones with the pull top opening
seal and have no sharp edges. I screwed a dowel to the bottom
of the can to keep the spool centered. The can keeps the wire
under control as it unspools. When I want to change wire guages
I simply put the lid on over the loose end of wire and that
keeps the loose end in place. I label each can with permanent
marker and it's a quick change, neat and organized way of
working things. I open a drawer and set the can directly below
the tensioning device on a "table" made from corian
scrap; this "table" is also used to hold and cut
tape. Very cool little setup. I was using a rack which held
3 spools for a while, but this works better IMO.
Also visible in the picture is the handheld
LCR meter which is certified but inexpensive. A dremel with
the heavy metal router base. Not visible is another dremel,
the panaflex vise, arbor press, wax pot, Makita cordless drill/driver,
spools of hookup wire, and assorted other minor tools cluttering
up the worktop and filling the drawer.... This winter I will
be remodeling the basement and setting up a proper workshop.
The only other tools normally used are
a small bandsaw, a benchtop belt/disk sander, and a drill
press with milling vise. These tools are not kept in the same
work area due to the possible metal contamination of the pickups/
damage.